
NOTE:
In case the engine is supplied already assembled on the chassis, it is at care of the assembler to follow these instructions. The final customer, in this case, can skip this section and can start reading from section 4.Whenever the engine or a component is disassembled, it is necessary to always follow the under shown instructions for proper reassembly.
INSTALL THE WATER COOLING SYSTEM
NOTE:
To install the water pump belts it is necessary to remove the rear axle.
- REINSTALL THE REAR AXLE AFTER HAVING INSERTED THE TWO BELTS.
SUGGESTION:
INSTALL OTHER TWO BELTS AS SPARES AND FIX THEM WITH TAPE TO THE AXLE.
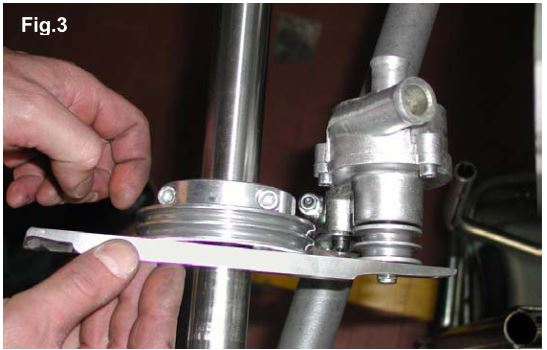
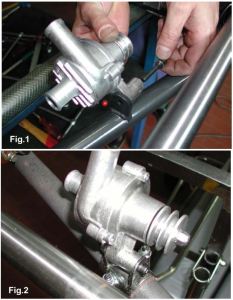 INSTALL THE WATER PUMP (1 SCREW M6 X 45 WITH WASHER AND SELF LOCKING NUT) ON THE PUMP BRACKET ON THE REAR CROSS RAIL (SEE FIG. 1).
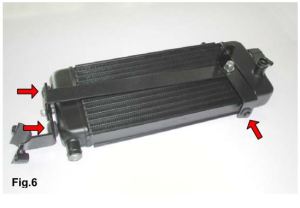
IN CASE THERE IS NO BRACKET FOR THIS PURPOSE IT IS NECESSARY TO INSTALL THE PUMP ON REMOVABLE CLAMPS AVAILABLE IN DIFFERENT DIAMETERS (∅ 28/30/32mm) AS ACCESSORIES (SEE FIG. 2).
TIGHTEN BY HAND THE SCREW ON THE PUMP LETTING IT FREE TO ROTATE FOR THE TENSIONING OF THE BELTS.
 INSTALL ON THE AXLE THE DRIVING PULLEY (n°2 CLAMPS AVAILABLE IN DIFFERENT DIAMETERS ∅ 30/35/40/50mm) ALIGNING ITS RACES WITH THE DRIVEN PULLEY.
TIGHTEN THE CLAMPS WITH TWO SCREWS M6 X 25.
- INSTALL THE BELTS AND TENSION (SEE FIG. 4)

BEFORE INSTALLING THE RADIATOR PREASSEMBLE THE FOLLOWING COMPONENTS
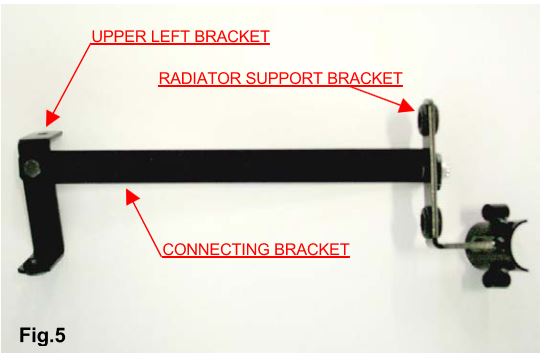
- ASSEMBLE THE CONNECTING BRACKET ON THE RADIATOR SUPPORT BRACKET.
- INSTALL THE UPPER LEFT BRACKET ON THE CONNECTING BRACKET (SEE FIG. 5)

- INSERT THE RADIATOR BY FITTING IT ON THE SUPPORTS (SEE FIG. 6).
- INSTALL THE UPPER RIGHT BRACKET AND FIX TO THE RADIATOR FIXING SUPPPORT. TORQUE ALL BOLTS.

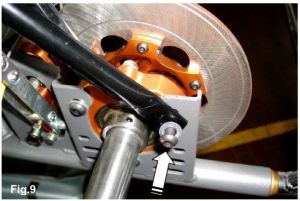
- PLACE THE RADIATOR SUPPORT BRACKET ON THE SIDE RAIL, BRAKE SIDE (TIGHTEN
THE BOLTS BY HAND) (SEE FIG. 8).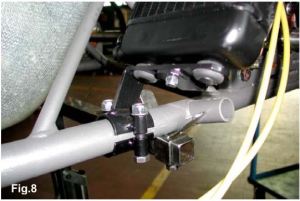
 PLACE THE RADIATOR SO THAT THE HOLE ON THE RADIATOR FIXING SUPPORT AND
ONE OF THE UPPER HOLES OF THE BEARING SUPPORT BOX MATCH.
ONCE YOU FIND THE CORRECT POSITION FIX THE WHOLE.
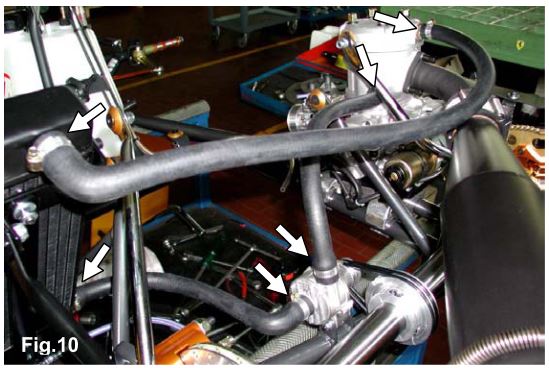
- THE KIT INCLUDES TWO RUBBER HOSES. CONNECT THE FIRST HOSE TO THE FITTING ON THE RADIATOR INLET AND THE FITTING ON THE ENGINE OUTLET, TIGHTEN WITH STEEL CLAMPS (SEE FIG.10).
 CUT THE SECOND HOSE AT AN APPROPRIATE LENGTH TO CONNECT, ON ONE SIDE, THE FITTINGS ON THE RADIATOR OUTLET AND THE PUMP INLET AND ON THE OTHER SIDE THE FITTINGS ON THE PUMP OUTLET AND THE ENGINE
INLET (SEE FIG. 10).
FIX WITH STEEL CLAMPS.


BEFORE STARTING THE ENGINE, FOLLOW THESE RECOMMENDATIONS:
- Unscrew the cap on the radiator and loosen the breather plug on the engine head.
- Fill the radiator until the water comes out from the plug on the head (there is no air in the system now) and the radiator is completely filled. Tighten the cap (the system contains appr. 1 lt. of water).
- It is advisable to put a small cup to recover water from the breather on the cap in case of boiling water.
- After the engine run-in, check the water level in the radiator and top up if necessary.